similar circuits
- Stablised Power Supply With Short-Circuit Indication
- 3-30V 3A Adjustable Regulated DC Power Supply
- 9 Volt 2 Ampere DC Power Supply Circuit Diagram
- Adjustable 1.3-22V Regulated Power Supply
- Adjustable Current Limit For Dual Power Supply
- Quad Power Supply For Hybrid Amplifier
- Stabilized Regulated Power Supply Circuit
- Transformerless 5 Volt Power Supply
- Variable Dc Power Supply
- High-Voltage Regulator With Short Circuit Protection
- Ampere or Current Booster Circuit
- Smoke Alarm Battery Life Extender
- High Current Regulated Supply
- 2 Watt Switching Power Supply
- Variable Voltage and Current Power Supply
3-30V 3A Adjustable Regulated DC Power Supply
Description
This power supply is meant as an auxiliary or as a permanent power supply for all common circuits based on a stabilized DC voltage between 3 and 30V provided that the consumption does not exceed 3A. Of course this power supply unit can also be used for other purposes. Be replacing the trimmer by a potentiometer, it may even be used as an adjustable power supply unit. A good quality heatsink must be used.
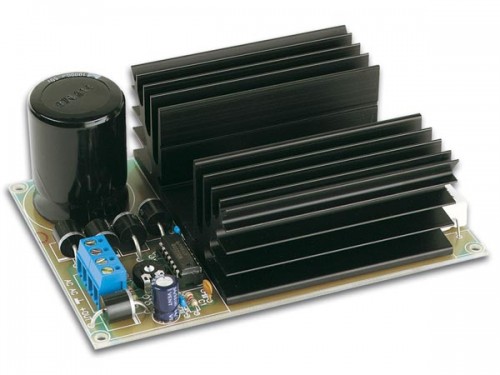
Picture of project:
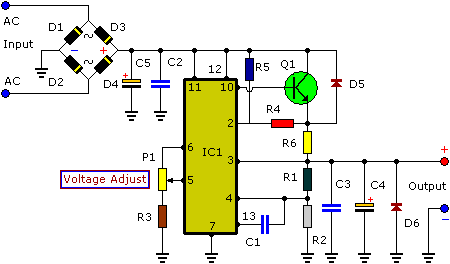
Circuit diagram:
Parts list:
- R1 = 8.2K
- R2 = 2.2K
- R3 = 680R
- R4 = 1K
- R5 = 82K
- R6 = 0.18R/5W
- C1 = 470p
- C2 = 100nF-63V
- C3 = 100nF-63V
- C4 = 100uF-63V
- C5 = 10KuF-60V
- D1-D6 = 6.6A
- Q1 = MJ3001 (Darligton)
- IC1 = UA723D
Specifications:
- Overload protected
- Sshort-circuit stable
- Output current: max. 3A
- Output ripple voltage: 0.5mV
- Output voltage: adjustable from 3 to 30V, stabilized
- Input voltage: 9 to 30V AC (depending on the desired output voltage)
Assembling into a housing:
- Depending on the transformer used, one may chose one of two housings
- If a metal housing is used, it must be earthed for security purposes.
- Make sure the cooling body does not touch the housing. This might cause a short circuit.
- When mounting a toroidal transformer, it must be seen to that the fixation bolt does not touch the cover. This might cause the burning of the transformer
- If the circuit is to be integrated into another housing, it must be provided with ventilation holes (one may make these holes oneself), necessary for the release of the heat developed.
Notes :
- Connect a voltage meter to the points ‘GND’ and ‘+OUT’ and adjust ‘RV1’ until the desired output voltage is reached.
- Apply some thermo-conducting pasta to the bottom side of the transistor and mount it on the heatsink.
- If you need 3-8 volt then R2 will be 5.6K
- If you need more than 8 volts then the R2 will be 2.2K
- Suitable transformer 30vAC at 120VA

